Adding a House

Designing a house in Realtime Landscaping is simpler than most home design programs. Since the focus is on designing your landscape and the house exterior, complex houses can be built as a series of simpler parts without worrying about the complexity of interior walls and structure.
Houses can be designed from scratch, or a pre-built house can be added using the House Wizard.
To add a house:
-
From the Building tab, click Add House.
-
Draw the outline of the house by clicking the left mouse button to add points. Press Backspace to remove the last point added, and press Esc to cancel. If you would like to input the distance and angle manually, place at least one point and then press Enter.
-
To finish drawing the house, place the last point on top of the first point. Or right-click to place the last point, and it will automatically connect to the first point.
The house will then be created, and a roof will be added automatically.
You can then add additional objects to enhance your house design:
To create more complex houses, simply create additional House objects. For example, two house objects can be overlapped to achieve unique roof lines. An example is shown below:
Tips:
-
If the outline turns red, then the roof cannot be constructed. See Red Outline, below, for details.
-
For some good examples of how to create houses, use the House Wizard to add a pre-built house. Click the Ungroup button to separate the house into its individual objects. Then move the individual objects for a better idea of how the house was put together.
-
As an alternative to creating a 3D design, you can also use Realtime Landscaping Photo (included) to create a 2D design over a photograph of your house.
-
The snap-grid makes accurate houses easy to draw; see Snap Settings for details.
Changing the Roof Type
You can create a wide variety of roof types including hip, gable, Dutch hip, mansard, gambrel, and more. Using the Roof Type tool, simply click on the wall below the roof to change the roof type over that wall.
To change the roof type:
-
Click the Edit Roof Type button to enable roof editing mode.
-
Click the house wall underneath the part of the roof you want to change. Each click will toggle between the various roof styles. For roof styles with multiple sections (such as Dutch hip, mansard, and gambrel), enter the desired offset for the upper section in the Upper offset property.
-
If the upper section has a different pitch than the lower one, click Add upper pitch and enter the desired pitch for the upper section.
-
After you are finished editing the roof, click the Edit Roof Type button again to disable roof editing mode.
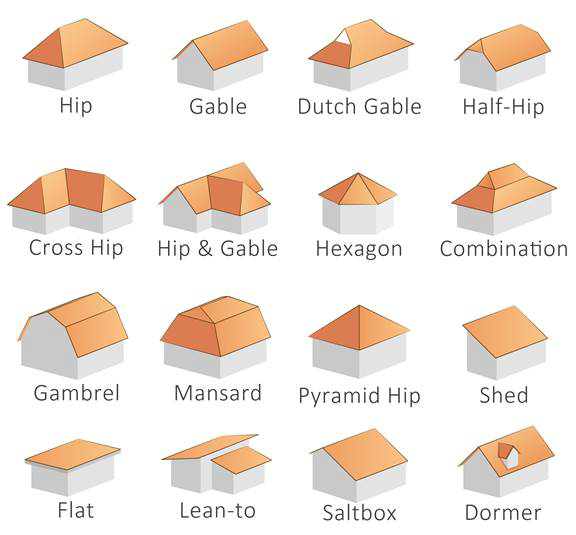
Some roof types can be built using a single House object, while others require two or more. The following shows some of the styles available.
To open a sample design that includes the above styles:
-
From the File menu, click Open Sample.
-
If needed, navigate to the following folder: \Users\ user \Documents\Realtime Landscaping version \Sample Landscapes\ where user is your Windows user name and version is the product version.
-
Open the file Sample House Styles.
Roof Pitch
Roof pitch is specified in degrees. You can enter the angle directly, or use the rise/run or slope form which will be converted to degrees automatically.
- Angle: Pitch angle in degrees.
- Rise/Run: Traditional U.S. format, representing inches of rise per 12 inches of run.
- Slope: Slope percentage, which is calculated as (rise/run) * 100%. This is common when using metric.
The following table shows some common roof pitches in each format:
| Angle | Rise/Run | Slope |
|---|---|---|
| 14.04° | 3/12 | 25.00% |
| 18.43° | 4/12 | 33.33% |
| 22.62° | 5/12 | 41.67% |
| 26.57° | 6/12 | 50.00% |
| 30.26° | 7/12 | 58.33% |
| 33.69° | 8/12 | 66.67% |
| 36.87° | 9/12 | 75.00% |
| 39.81° | 10/12 | 83.33% |
| 42.51° | 11/12 | 91.67% |
| 45.00° | 12/12 | 100.00% |
Note: When entering the pitch in slope format, be sure to include the percent sign (%). Otherwise the input will be assumed to be in degrees.
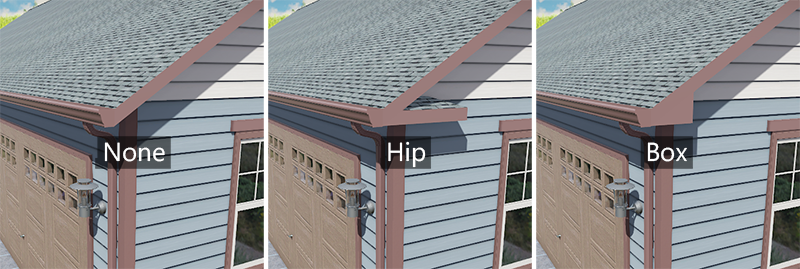
Gable End Returns
Gable end returns are short extensions of the roof edge that wrap around the corner of a gable wall, creating a visually pleasing transition. Two styles are supported, Hip and Box.
To enable gable end returns, check the Add gable end returns option. Use Return Style to set the desired style, and Return Length to set the length.
Designing Multistory Houses
Multistory houses can be created by simply stacking a top floor over a bottom floor. To do this, create the bottom story as detailed above, and then use the Add House tool to create the upper story. When the upper story is complete, set the Elevation property of the upper story to the Wall height of the lower story.
In most cases, you will want to remove the roof from the bottom story. To do this, set the Roof Pitch to 0.
Creating Shed Roofs
You can design roofs with a single sloping surface. This is useful for creating sheds, rectangular bay windows, carports, and more.
To design a roof with a single sloping surface:
-
Select the house you want to edit.
-
Click the Edit Roof Type button to enter roof editing mode.
-
Click each of the house walls below the roof you want to change, except for the wall that will have the lowest roof edge.
-
When you are finished, click the Edit Roof Type button again to leave roof editing mode.
Designing Carports
A carport can be designed by creating a roof without walls, which is also useful for creating covered patios, overhangs, and more.
To design a roof without walls:
-
Click the Add House button and create a house normally.
-
Set Wall Height to 0.
-
Set Elevation to the desired roof height.
Designing a Flat Roof
To create a flat roof without any overhang, set the Roof Pitch to 0.
However, if you want a flat roof with an overhang, set the Roof Pitch to 1. The roof will not be completely flat, but the slope should be small enough for a good approximation.
Building on a Slope
By default, the house elevation is determined by the lowest point on the underlying terrain. If your house has a flat foundation, then you can use an Area Grader to provide a flat building surface.
You can also use a Patio object for the house foundation. You can then adjust the elevation of the house simply by adjusting the height of the patio object.
For daylight basements and other designs requiring sloping or uneven terrain, you can use the Absolute Elevation option to place the house at a fixed elevation. This is especially useful when your house consists of multiple House objects because it ensures their elevations remain unchanged regardless of any changes to the underlying topology.
Editing Siding
You can define up to four different siding materials. Siding 1 is the base siding, and Siding 2-4 can be used for other purposes, such as accent walls.
First, define up to four different siding materials. Click Enabled to enable the siding, and then choose the desired material. Repeat for each different material you want to use.
Then use the following steps to edit the siding:
- Click the Edit Siding button.
- Click on the wall you want to change. Each click will cycle through the siding materials you have enabled.
- When finished, click Edit Siding again to exit siding edit mode.
Editing Corner Trim
Corner trim can be toggled on and off at each corner.
- Ensure Add corner trim is checked. This option enables or disables corner trim for the entire house.
- Click the Edit Corner Trim button.
- Click on the corner you want to change. Each click will toggle the corner trim on or off. Hold Ctrl while clicking to affect all corner trim at once.
- When finished, click Edit Corner Trim again to exit corner trim edit mode.
Editing Gutters
Gutters can be toggled on and off at each wall. Styles include rectangle, half-round, copper, and aluminum.
- Ensure Add gutters is checked. This option enables or disables gutters for the entire house.
- Click the Edit Gutters button.
- Click on the wall you want to change. Each click will toggle the gutter or off. Hold Ctrl while clicking to affect all gutters at once.
- When finished, click Edit Gutters again to exit gutter edit mode.
You can also easily add downspouts that automatically connect to the gutters and extend to the ground. See Adding a Downspout for details.
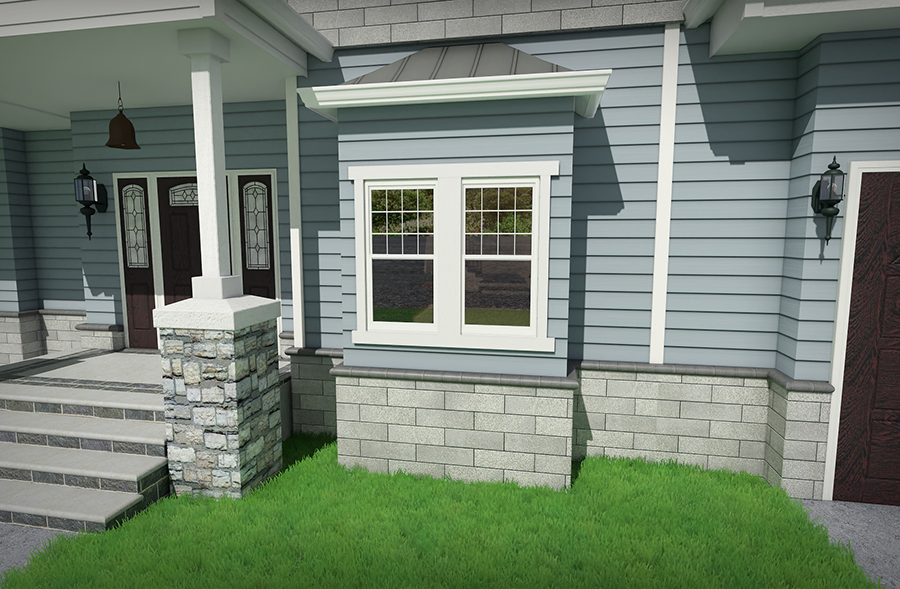
Adding Veneer
Decorative veneer can be automatically applied to the lower portion of the house. Veneer can surround the entire house, or be toggled on or off per wall as desired.
- Ensure Add veneer is checked. This option enables or disables veneer for the entire house.
- Click the Edit Veneer button.
- Click on the wall you want to change. Each click will toggle the veneer or off. Hold Ctrl while clicking to affect all walls at once.
- When finished, click Edit Veneer again to exit veneer edit mode.
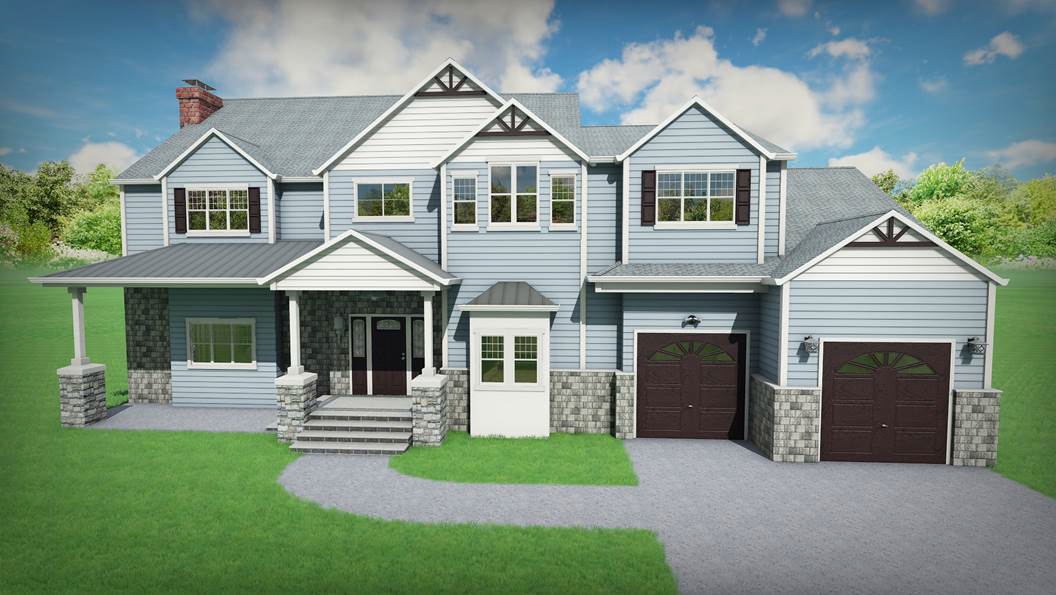
The following home design uses a stone veneer with a rounded cap.
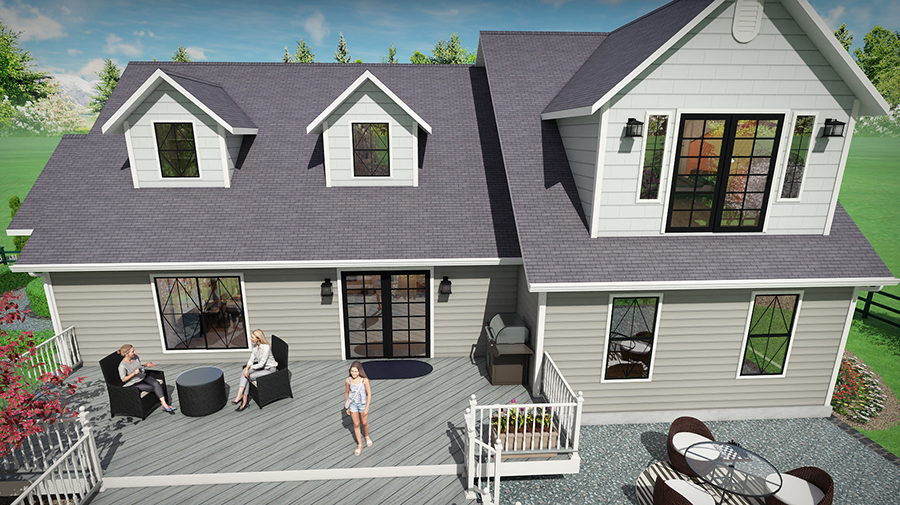
Adding Dormers
In Realtime Landscaping, you can add a dormer by creating a small house and placing it on top of the main house. Simply create the dormer as you would a regular house, and set its position and elevation as desired.
This technique was used to create the dormers in the following design.
Note: To create dormers that are flush with the wall below (also known as wall dormers), check the Clip underlying roof option. This removes the roof overhang beneath the dormer, but only when the dormer's outer edge perfectly aligns with the wall.
Red Outline
Certain roof styles may not work together, so if the house outline turns red, it means the roof cannot be built. To avoid this, ensure that the house outline does not intersect itself. If this occurs while changing the roof type on a particular wall, it indicates that the chosen type is not compatible with the neighboring roof styles or the current shape of the house outline.
Customizing the Plan View
Applies to:  Plus Pro
  Architect
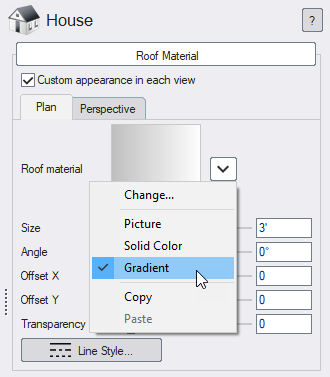
Houses can appear as either a floor plan or a realistic top-down view of the structure in the Plan view. If you want your house to be displayed as a floor plan, select the house and click the Custom appearance in each view checkbox.
You will now see two tabs appear to the right of the screen: Plan and Perspective. The Plan and Perspective tabs allow you to customize how the selected house will appear in each view. For example, you could set a house to look like a floor plan sketched with colored pencils in the Plan view, but to look normally in the Perspective view.
Doors, lights, windows, and awnings will appear as symbols in the Plan view when displaying the house as a floor plan.
The default style for a floor plan is a white interior with a black outline. The outline can be changed by clicking the Line Style button.
The background of the floor plan can be modified by selecting your house and clicking the drop-down arrow next to the Roof material (as shown below). There are three available background types for floor plans: pictures, gradients, and solid colors.
For example, if you want your floor plan to use a gradient fill, select Gradient and set the start and end colors as desired.