Adding a Deck

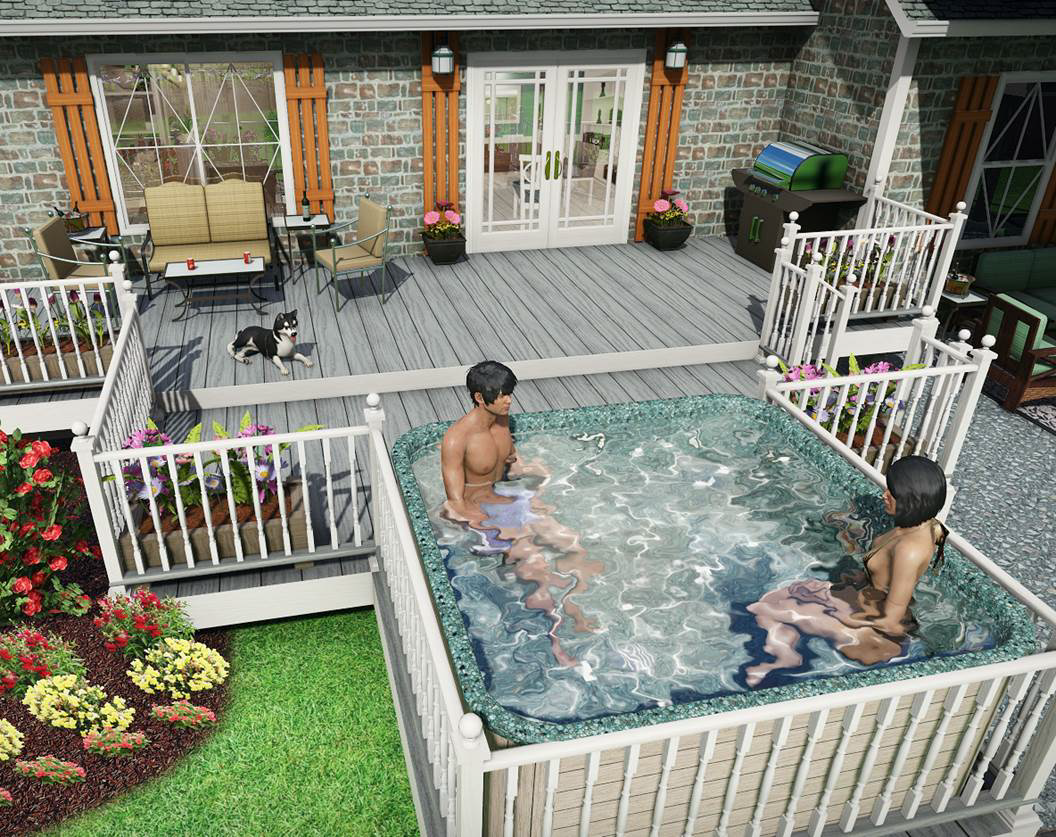
A large variety of deck styles can be created in Realtime Landscaping, including straight, multilevel, curved, and even decks with holes for hot tubs.
Realtime Landscaping makes it easy to create intricate deck designs; simply draw an outline for the deck, and all the work of adding support posts, framing, railing, balusters, and more, is done automatically. Decks can be designed from scratch, or the Deck Wizard can be used to add a pre-built deck.
To add a deck:
- From the Building tab, click Add Deck.
- Draw the outline of the deck by clicking the left mouse button to add points. Press the Backspace key to remove the last point added, and press the Esc key to cancel. If you would like to input the distance and angle manually, place at least one point and then press Enter.
- To finish drawing the deck, place the last point on top of the first point. Or right-click to place the last point; it will automatically connect to the first point.
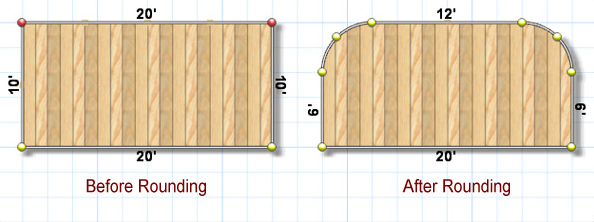
Creating Curved Decking
The curvature of a deck can be edited at any point, allowing you to create accurate bends and rounded corners. For details on how to manipulate the points of a shape, see Editing Points.
If multiple sharp corners need to be rounded, see below for an easy way to round them all at the same time.
To round one or more corners:
- Click the deck you want to modify to select it. If more than one deck needs to be edited, hold the Shift key while clicking on additional decks.
- Click Edit Points.
- Click the corner point(s) that need to be rounded. If more than one point must be rounded, hold the Shift key while clicking on additional points.
- Click the Round Corners button that is found underneath the Edit points button, or press the O key.
- press Enter if you know the radius and want to enter it manually. Or, to set the radius interactively, move your mouse over one of the selected points, click and hold the left mouse button, and move the mouse to round the corners. While the corners are being rounded, you will see the radius displayed at the bottom of the screen. When the desired radius is reached, release the left mouse button.
- Click the Edit Points button again to disable point editing mode.
The following picture displays the same deck before and after two of its corners have been rounded using the steps above:
Tip: You can bevel corners using a similar method. In step 4, click the Bevel corners button or press the H key.
Cutting Holes
Holes of any shape and size can be cut into decks to make room for hot tubs, gardens, or other features.
To cut a hole in the deck:
- Select the Plan view.
- From the Building tab, click Add Retaining Wall. (Any shape-based object can be used, but retaining walls work well since they can be made higher than the deck. This will make it easier to select in the following steps.)
- Click Shape Options and Load Shape.
- Select the circle and click OK.
- Set the retaining wall height to be taller than the deck to make it easier to select.
- Move the circle over the deck and scale it to the size of the hole you want to make.
- Click your deck to select it.
- Hold the Shift key and click the retaining wall to select it as well. Note that the selection order is important for creating holes; the deck must be selected first in this case.
- From the Edit menu, click Shape and Boolean Subtract.
The picture below shows a deck after a hole has been made. The Hide deck boards option was used to expose the deck framing.
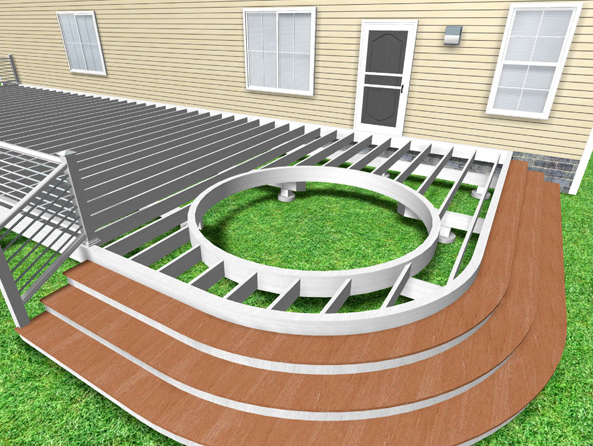
For more information on cutting shapes from one another, see Using Booleans to Create Complex Shapes.
Deck Railing
The entire deck receives railing by default, but railing can be toggled on and off per edge using the Toggle Railing button. Note that you do not need to turn off the railing where you plan to add deck stairs; the deck stairs will automatically remove the railing for you.
You can also add standalone railing that can be placed anywhere on the deck. See Adding Railing for details.
To turn railing on or off:
- Select the deck and click Toggle Railing to enable railing editing mode.
- Click each of the deck edges that need railing removed.
- When you are finished, click the Toggle Railing button to disable railing editing mode.
Customizing the Plan View
Applies to:  Plus Pro
  Architect
Within the Plan view, decks can have a customized appearance. For example, a deck could look realistic in the Perspective view, but have a dark outline with a gradient fill interior when viewed in the Plan view. To customize the way the deck looks in the Plan view, click the deck to select it. Then in the Material category, check the Custom appearance in each view option. Two tabs will appear: Plan and Perspective. These two tabs allow you to customize how the deck appears in each view. If the Custom appearance in each view option is unchecked, then the deck will appear the same in both views.
Tips:
- Using the grid snap feature can make adding an accurate deck very easy. See Snap Settings for more details.
- Multistory decks can be built by adding each of the deck stories as individual decks using the steps above. For the upper-level deck stories, set Elevation to the desired height.
- Stairs can be easily added to any deck in your landscape design. For details, see Adding Deck Stairs.