Adding a Pond
Applies to:  Plus
Plus  Pro Architect

Realtime Landscaping Pro and Architect include comprehensive support for ponds, waterfalls, and other water features, which are an important part of many modern landscape designs. Once a pond is added to your landscape, you can easily modify its shape, alter the water depth, move the entire pond, select a rock border, and choose one of many materials for the pond, such as dirt, rockery, and loose stone. Ponds can be designed from scratch, or pre-built ponds can be added to your design using the Pond Wizard.
When walking through your landscape design in the Realtime Walkthrough mode, and when creating movies, koi fish will automatically be added to every pond that is large enough to contain them. See Realtime Walkthrough for more information.
To add a pond:
- From the Water Features tab, click Add Pond.
- Draw the outline of the pond by clicking the left mouse button to add points. Press the Backspace key to remove the last point added, and press the Esc key to cancel. If you would like to input the distance and angle manually, place at least one point and then press Enter.
- To finish drawing the pond, place the last point on top of the first point. Or, right-click to place the last point; it will be automatically connected to the first.
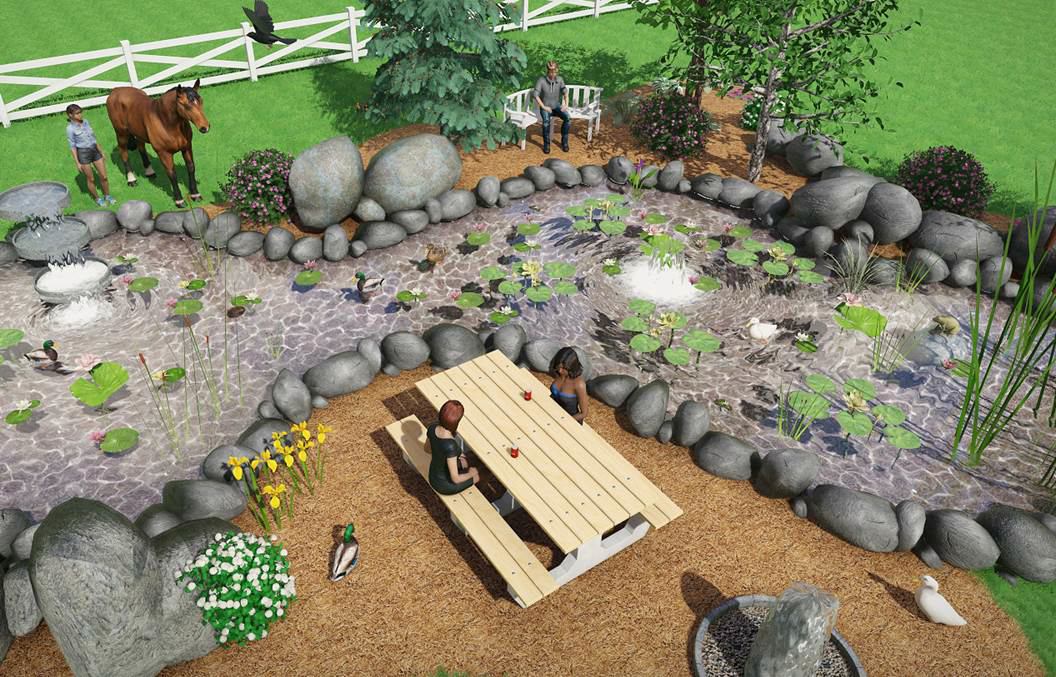
The following landscape design features a pond, waterfall, plants, and other objects.
Rock Border
Rock borders are automatically added to ponds, but can be modified as needed or toggled off.
To turn the rock border on or off per edge:
- Click Edit border to enable rock border editing mode.
- Click the edges of your pond where you would like to toggle the rock border on or off.
- When finished, click Edit border again to disable rock border editing mode.
Controlling the Render Order
When overlapping objects, such as ponds, regions, and paths, are added to your landscape design, you can control which ones appear on top. For example, if you first add a pond and then later add a large grass region over the top, the grass will appear over the pond. To fix this, select the grass region and then click Edit , Render Order , and Send to Back (or press the shortcut keys Ctrl+B ). See the Working with Overlapping Regions portion of the Adding a Region topic for a more detailed explanation.
Customizing the Plan View
Applies to: Plus Pro Architect
Ponds can be given separate materials in the Plan and Perspective views. This is useful if you want your Plan view to look stylized, but want the Perspective view to look realistic. To allow a separate material to be shown in each view, click Custom appearance in each view and customize the Plan view as desired.
Tips:
-
Important: Depending on your local building codes, ponds deeper than a certain depth may require a fence or have other restrictions for safety purposes. Please check your local building codes before building a real pond.
-
Streams can be added to flow into your pond. For details, see Adding a Stream.
-
Fountains and waterfalls can be integrated into your pond design; see Adding a Fountain and Adding a Waterfall for more information.
-
Pre-built ponds can be added to your landscape design using the Pond Wizard.
-
Landscaping rocks can be added in and around your entire water garden design; see Adding a Rock for details.
-
Plants can be added in and around your pond design; see Adding a Plant for details.
-
The shape of your pond can be easily edited at any time. For more information, see Editing Points.
-
During movie creation and Realtime Walkthroughs, koi fish are automatically placed in ponds that are at least two feet deep. The number of fish added to your ponds depends on the size of the ponds and the Amount of Wildlife setting, which is found within the Environment Settings dialog.