Plant Label Wizard
Applies to:  Plus Pro
  Architect
The Plant Label Wizard is used to automatically label every plant in a landscape design. These labels appear only in the Plan view, and can be adjusted as needed after they are added. The Plant Label Wizard is a valuable timesaver, especially when working with large and complex landscape designs.
The Plant Label Wizard can be used as many times as necessary; running the wizard a second time will simply replace all of the previous labels with new labels. The wizard adds labels into a layer named Auto Plant Labels; this layer is created automatically if needed. We recommend only using this layer for labels that are added using the wizard.
Important: Plant Labels are not connected to the actual plants. That is, once a Plant Label has been added (either manually or by the wizard), it is a separate object and not associated with the original plant. While this means you can freely change one without affecting the other, it also means that changes to the plant will not automatically update the label and vice versa. See Customizing and Automatically Updating Plant Labels below for details about how you can use the Plant Label Wizard to update the plant labels in your design.
To add plant labels using the Plant Label Wizard:
- From the Tools menu, click Plant Label Wizard.
- Click Next ; the dialog shown below will appear.
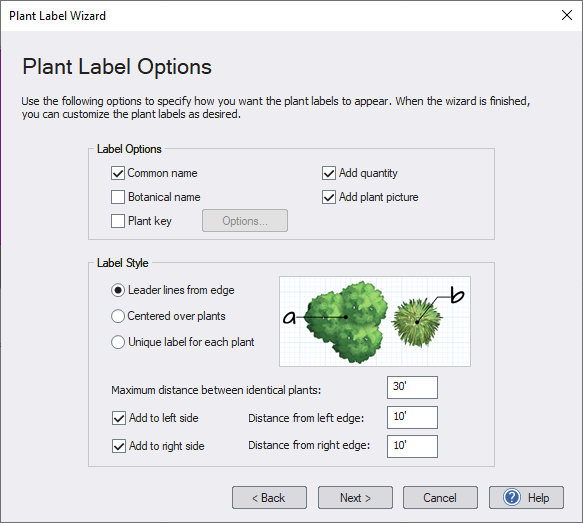
Common Name
Include the common name in the label.
Botanical Name
Include the botanical name in the label.
Plant key
Include the plant key in the label. Click Options to customize how the plant keys are generated. See Generating Plant Keys , below, for details.
Add quantity
Include the plant quantity in the label.
Add plant picture
Use a label that includes a picture of each plant type.
Label Style
Select which label style you would like to use: either placed at the edge of your design with leader lines, or centered over the plants.
Maximum distance between identical plants
Determines how far apart plants of the same type need to be in order to avoid being grouped. See below for more details.
Add to left/right side
Determines where the labels are added: to the left side, right side, or both. This option is only used when adding labels to the edge of your design.
Distance from left/right edge
Margin between the edge of your landscape design and the plant labels. This option is only used when adding labels to the edge of your design. 3. Set the desired plant label options and click Next. 4. Click Finish to complete the wizard.
Generating Plant Keys
You can choose to use the existing plant keys or generate new keys automatically. Generating new keys is especially useful when using placing labels over the plants using the Centered over plants option.
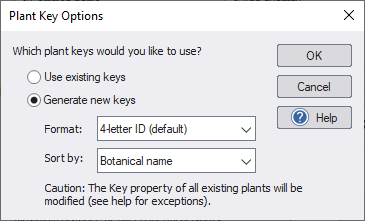
Caution:
When generating new plant keys, the existing keys will be overwritten. This is only a concern if you have entered custom values for the Key property in one or more plants.
Setting the maximum distance between identical plants
The Maximum distance between identical plants option helps you control how many plant labels are added. For example, the landscape in the picture below includes three plant groups that are approximately 6 feet apart. During the Plant Label Wizard, the maximum distance was set to 5 feet. Notice how each plant group has its own plant label.
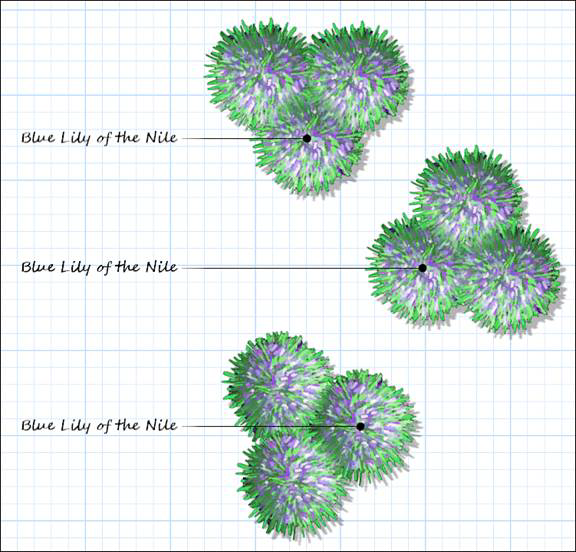
Increasing the maximum distance to 10 feet results in a single label for all three groups, as shown below.

Tip: If you want every plant to have a label, set the Maximum distance between identical plants to 0.
Customizing and Updating Plant Labels
The first time you use the wizard in a particular landscape design, the plant labels will be created using the default font, line style, and other properties. You can then edit the labels and change their appearance as desired.
To customize the appearance of the plant labels after using the wizard for the first time:
- Use the wizard to add plant labels.
- Click one of the labels to select it.
- From the Edit menu, click Select and Select Similar. Or press the L key. This will select all of the plant labels.
- Change the font, line style, and other properties as desired.
When you make changes to your design, you can re-run the wizard and update the plant labels. When you do this, do not delete the old plant labels -- let the wizard do it. The wizard will use the font, line style, and other properties from the first label in the Auto Plant Labels layer, and automatically apply them to the new labels. The wizard will automatically replace the old labels in that layer with the new ones.
Preventing Labels for Certain Plants
You can exclude plants from appearing in the Project Material List, which will also prevent them from receiving labels from the Plant Label Wizard. For example, you might want to include only new plants, but exclude those that already exist on the property.
To exclude plants from the Project Material List:
- Select each of the plants that you want to exclude. See Selecting objects for details.
- From the Edit menu, click Advanced Object Properties.
- Uncheck the Include in Project Material List option and click OK.
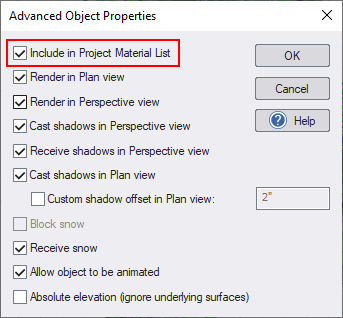
Important: This will also prevent the selected plants from appearing in the Project Material List and the Plant Legend.
Tips:
- If you want every plant in your landscape design to have its own label, then set the Maximum distance between identical plants value to 0.
- The automatic plant labels that are added using the Plant Label Wizard can be edited normally. The labels are not strictly connected to the corresponding plants, meaning you can delete a label without affecting the plant.
- The labels that are added using the Plant Label Wizard can be undone normally, meaning that if you want to undo the wizard's changes, just click Edit and Undo.