Moving Objects

To move an object that is not currently selected:
- Click the Move tool that is found to the left of the screen. Or press the T key.
- Click the object in your design that you want to move in order to select it.
- Click the object again, but this time hold down the left mouse button as you move the mouse. Or press Enter to move the object manually.
To move one or more selected objects:
- Move your mouse over one of the objects that you have selected.
- Click and hold the left mouse button, then move the mouse to relocate all selected objects. Or press Enter to move the objects manually.
To nudge one or more selected objects using the keyboard:
- Press and hold the Shift key.
- Press one of the arrow keys. Movement is relative to the Plan view. The nudge distance is 1" by default (2.54 cm). To change the nudge distance, see Program Settings.
To copy and move the selected objects:
- Move your mouse over one of the objects that you have selected.
- Hold Alt, then click and drag with the left mouse button to move a copy of the selected objects. You can release Alt after you begin dragging.
To move selected object(s) using the Move Dialog
- Press Enter.
- Select the desired move option.

Set new position
Moves the object to an exact X and Y location. For most objects, this position refers to the object's center point. Coordinates are relative to the Ruler Origin.
Move relative to current position
Moves the object by an X and Y offset from its current position.
Changing Object Elevation
The Move tool can be used to elevate or lower many types of objects in your landscape, such as plants, accessories, houses, and more.
To change an object's elevation using the mouse:
- Click the Move tool that appears to the left of the screen. Or press the T key.
- Click the object you want to modify in order to select it.
- Hold the Ctrl key.
- Move your mouse over the object you want to modify.
- Click and hold the left mouse button, and then move the mouse up or down to raise or lower the object.
- Release the left mouse button and the Ctrl key when you are finished.
To nudge an object's elevation using the keyboard:
- Press and hold the Shift and Ctrl keys simultaneously.
- Press the Up key to increase the elevation, or the Down key to decrease the elevation. The nudge distance is 1" (2.54 cm) by default. To change the nudge distance, see Program Settings.
To change an object's elevation using the Move Dialog
- Press Enter.
- Click Change elevation.
- Enter the desired elevation change. Enter a positive value to raise the object, or a negative value to lower it.
Tip: If you lower an object too far, it may end up below the ground and appear to disappear.
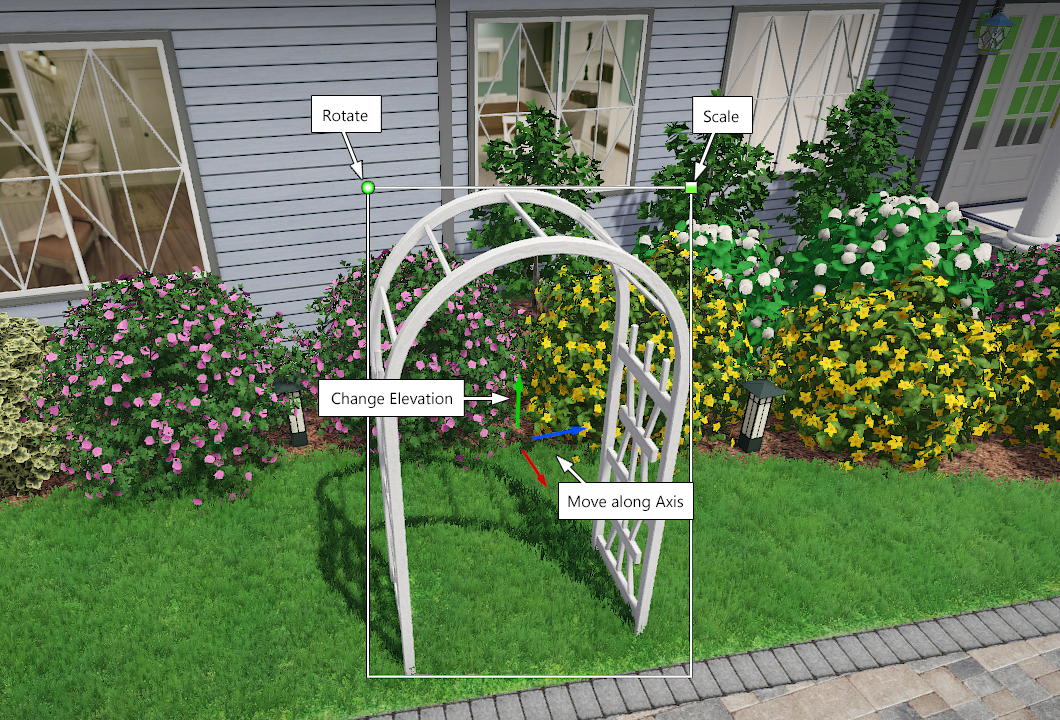
Moving, Scaling, and Rotating using Handles
As an alternative to using the Scale and Rotate tools, you can also rotate and scale objects using handles. Whenever an object or a group of objects is selected, a green dot will appear to the upper-left of the object, and a green square will appear to the upper-right (see picture below). The green dot is called the Rotate Handle, and can be used to quickly rotate your object. The green square is called the Scale Handle, and can be used to quickly enlarge or shrink your object.
To use either of the handles, click on the appropriate handle and hold down the left mouse button, then move the mouse as your object rotates or scales.
To move your object, simply click on the selected object and drag. Movement is normally constrained to the ground, but many objects support changing their elevation by holding the Ctrl key while dragging.
To constrain movement to a single direction (axis), click and drag one of the colored arrows as shown below.