Realtime Walkthrough
Realtime Walkthrough is a special viewing mode for exploring your landscape design from a first-person perspective. Design elements such as selection boxes and placeholders are removed or replaced with their realistic counterparts. Animated birds, butterflies, fish, and other effects are also available.
To start a Realtime Walkthrough, click the Realtime Walkthrough tab that appears to the bottom-left of the viewport. The following dialog will appear:

Standard
Walk through your landscape in first-person mode, using the mouse and keyboard to control your viewpoint.
Realtime Camera
Explore your landscape using a predefined camera path. See Adding a Realtime Camera for details.
Invert
Check this option if the vertical mouse movements seem reversed to you while in the walkthrough. This option is similar to the controls in airplane simulators.
Auto level when moving
When Auto Level is checked, your view will automatically straighten out to eye level while walking. This can be useful for new users, but most people leave this option disabled.
Strafe instead of turn
Normally the left and right arrow keys cause your view to turn left and right. When this option is checked, your viewpoint will move sideways instead of turning.
Use Oculus VR Headset
Check this option if you have an Oculus VR headset (such as the Rift or Quest 2) connected to your computer and want to use it for the Realtime Walkthrough.
Full Screen
When this option is checked, the walkthrough will occupy the entire screen. Otherwise, it will remain within the application window.
Environment Settings
Click to access options that affect the appearance and sound of your Realtime Walkthrough. For details, see Environment Settings.
Graphics Settings
Click to access options that affect the shadows, lighting, and other rendering features. For details, see Graphics Settings.
Create Movie
Use a Realtime Camera to create a walkthrough movie of your design. See Creating a Movie for details.
Once your walkthrough begins, press F1 for options. The following dialog will appear:
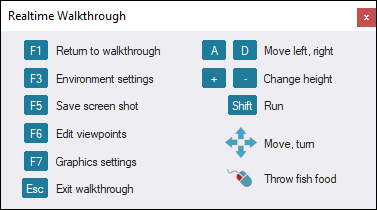
F1
Toggles the help menu on and off.
F3
Show the Environment Settings dialog.
F5
Save a screenshot. This opens the same export dialog used by the Perspective view.
Pro, Architect: You can also use Batch Export to create screenshots from multiple saved viewpoints.
F6
or V Save or load a viewpoint.
F7
Show the Graphics Settings dialog.
Esc
Exit the walkthrough. (Note: Pressing Esc while the dialog is active will only dismiss the dialog. Press Esc again to exit the walkthrough.)
Left/right arrow
Turn or move (depending on the Strafe instead of turn option shown above).
Up arrow or W
Move forward. You can also move forward by pressing and holding the right mouse button.
Down arrow or S
Move backward.
A, D
Move left or right.
Shift
Press and hold to move faster. Use this in conjunction with the other movement keys.
+/- (plus, minus)
Press and hold to increase or decrease the view elevation.
Left click (Pro, Architect)
Throw fish food. When thrown into a pond containing fish, the fish will swim over and eat the food. See Feeding the Fish for details.
Batch exporting screenshots during a walkthrough
Applies to:  Plus
Plus  Pro Architect
While in a Realtime Walkthrough, press F5 to open the export dialog. If you click Batch Export, you can select one or more saved viewpoints and create a screenshot for each one without leaving the walkthrough.