Adding a Height Painter

The Height Painter object lets you sculpt the terrain by "painting" the heights. This only affects the terrain heights, not the material displayed on the surface of the terrain.
To add a Height Painter:
- From the Terrain tab, click Add Height Painter.
- Click to place the first corner of the Height Painter.
- Click to place the opposite corner of the Height Painter.
Note: Be sure the Height Painter fully covers the area that you want to modify before you start painting. The terrain height adjustments are relative to the underlying terrain, so moving or resizing the Height Painter could cause the painted heights to become invalid, in which case you would need to erase the heights and start over.
To use the painting tools:
- Click the desired Height Painter to select it.
- Click the desired tool button. For example, click the Raise/Lower button to raise or lower the terrain.
- Set the desired brush properties, primarily the Brush Size and Brush Height. Use a small brush for localized changes, or a larger brush to affect larger areas. Enter a positive height to raise the terrain, or a negative height to lower the terrain.
- Select the desired brush shape. Default options include Circle and Square, but you can also select Custom Shape to use a shape from the shape library.
- Click and drag the mouse over the terrain you want to modify. Do this as many times as needed.
- To undo the last painting operation, click Undo.
The following tools are available:
| Tool | |
|---|---|
| Raise/Lower | Raise or lower the terrain heights by the value specified in the Brush Height. |
| Flatten | Set the terrain heights to the value specified by the Brush Height. |
| Clamp Min | Clamp the minimum terrain heights to the value specified by the Brush Height. |
| Clamp Max | Clamp the maximum terrain heights to the value specified by the Brush Height. |
| Smooth | Reduce sudden changes in the terrain heights. |
| Roughen | Add random variation to the terrain heights. Brush Height determines the maximum height variation. Brush Taper determines how far apart the random height variations will be. |
| Erase | Erase previous painting operations (click and drag over the areas you want to undo your height changes). |
| Erase All | Erase all painting operations for the currently selected Height Painter. |
Below are some examples of the Height Painter tools.
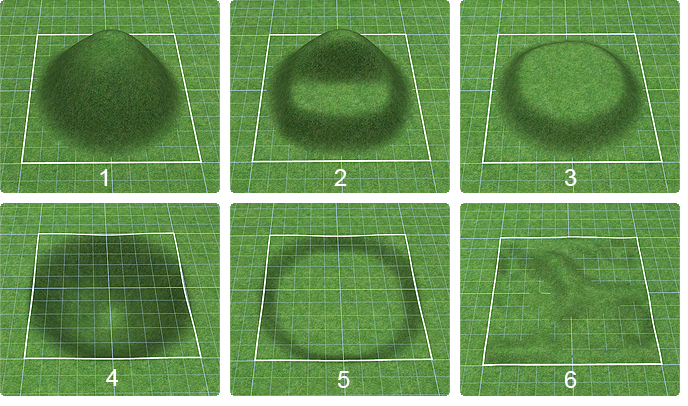
| Example | |
|---|---|
| 1 | The Raise/Lower tool was used multiple times. Each time, the brush size was reduced to make the mound. |
| 2 | Starting with #1, the Flatten tool was used to create the shelf. |
| 3 | Starting with #2, the Clamp Max tool was used to clamp the maximum height. |
| 4 | Similar to #1, but a negative height was used for the Raise/Lower tool. |
| 5 | Starting with #4, the Clamp Min tool was used to clamp the minimum height to slightly below 0. |
| 6 | Starting with an empty Height Painter, the Roughen tool was used to create the random height variations. The Smooth tool was then used to soften the result. |
Tips:
- Only the terrain inside the Height Painter can be modified.
- Multiple Height Painters can be used if needed. However, you can only paint on the currently selected Height Painter.
- The Brush Height slider is limited to plus or minus 50 feet (15.24 m), but by typing a value in the text field, it can be increased to plus or minus 300 feet (91.44 m).
- If a Height Painter overlaps other terrain sculpting objects, it may be necessary to modify the Terrain Sculpting Order.
- The painting operations are dependent on the underlying terrain. Therefore, ensure the size, placement, and sculpting order are all set properly before you start painting. Otherwise, the heights you paint may become invalid, in which case you would need to erase them and start over.