HDR Sky Settings
Applies to:  Plus
Plus  Pro Architect
HDR Sky lets you use a specific high dynamic range sky image for the sky and above-ground environment in the Perspective view.
HDR means High Dynamic Range. You may also see HDRI (High Dynamic Range Image). In this guide, HDR and HDRI mean the same thing.
To access these settings, open Environment Settings and click the HDR Sky tab.
You can import your own HDR sky files using the HDR Sky Import Wizard.
Unlike Sky type in Sky and Time of Day Settings, HDR skies do not change automatically with time of day and are not rotated automatically by North direction.
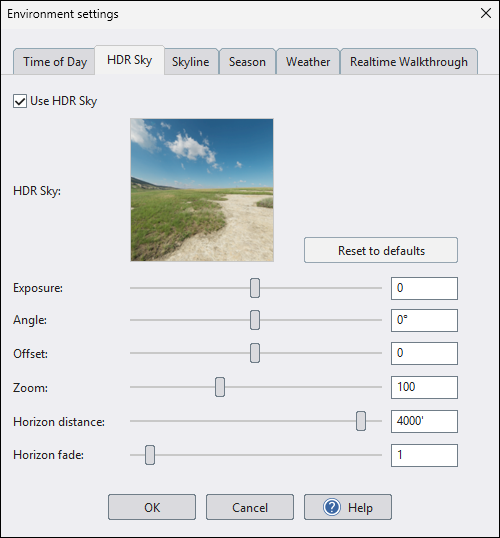
Use HDR Sky
Turns HDR Sky on or off. When HDR Sky is off, the sky comes from Sky type on the Time of Day tab.
Preview
Shows the currently selected HDR sky. Click the preview image to choose a different sky from the library or from your imported skies.
Reset to defaults
Resets the HDR Sky settings to their default values.
Exposure
Adjusts the HDR sky exposure from -5 to 5 EV.
This setting affects only the HDR sky image.
To adjust the brightness of the entire scene, use Exposure in Color/Brightness Settings. You can also enable Auto exposure in the Program Settings dialog under Program Graphics Settings.
Angle
Rotates the HDR sky image around the scene. Use this to align the HDR background (including the sun position) with your design.
Offset
Adjusts the horizon vertically. This is useful when matching the HDR horizon line to your design.
Use this to raise or lower the horizon if the HDR terrain line appears too high or too low relative to your design grade.
Zoom
Adjusts the zoom level of the HDR sky.
Changing the zoom can help the background in the HDR image better match the scale of your design. Note that values other than 100% may introduce slight distortion when you change the viewpoint.
Horizon distance
Controls how far the ground fades into the HDR sky at the horizon.
- Use a smaller distance for HDR skies with nearby horizon features (trees, buildings, mountains).
- Use a larger distance for open skies with a distant, unobstructed horizon.
Horizon fade
Controls the blending distance between the ground and sky.
Increase this value if your HDR sky includes nearby trees or buildings and you need a softer blend near the horizon.
Sky Type vs HDR Sky
Use Sky type when you want automatic behavior:
- The program automatically selects matching daytime, sunrise, and sunset sky variations.
- The sky rotates automatically using North direction, keeping the sun orientation aligned for you.
Use HDR Sky when you want a specific sky image and more manual control.
Aligning the Sun with an HDR Sky
For realistic results, align your scene's sun and shadows with the bright sun area in the HDR sky. If they don't match, lighting and shadows can look inconsistent.
- Set Time of day so the sun's height matches the HDR sky.
- Set North direction so shadows point in the same direction as the HDR sun.
- Use Angle (in HDR Sky) to fine-tune the sky image rotation.
- Check the scene in Perspective view and adjust until the sun position and shadows agree.
How HDR Sky Affects Lighting
The sun visible in the HDR image is part of the background image only. Direct sunlight and shadow direction come from your scene's sun settings (Time of day + North direction).
HDR Sky can still improve realism through environment reflections and, when using path tracing, bounced (indirect) lighting.
Using with Fog
Reducing the horizon distance may cause the fog to no longer align with the HDR horizon. If this happens, adjust the Fog Start Distance and Fog Height to blend the fog smoothly into the sky. See Fog Settings for details.
Using with a Skyline
When using a Skyline, the Horizon distance should be set to its maximum value, and Horizon fade should be set to 1. Otherwise a seam can appear between the ground and skyline.
Tips
- Use Horizon offset and Horizon distance together to align the sky with grade changes and distant background elements.
- Align the sun first, then fine-tune Zoom, Horizon distance, and Horizon fade for final integration.