Editing Materials
You can customize your accessories and landscape lights using the large variety of materials included with Realtime Landscaping Photo.
To customize an object's materials:
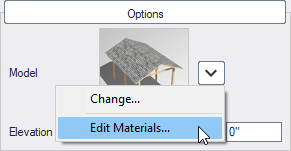
- Click the object you want to modify to select it.
Click the drop-down arrow that appears to the right of the picture, as shown below. Then click Edit Materials.
The following dialog will appear:
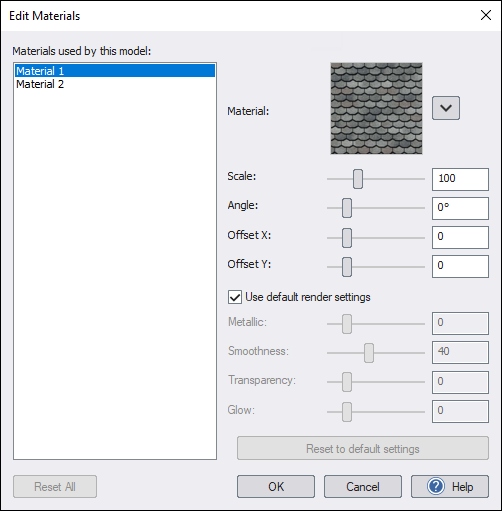
Scale
Adjusts the material size.
Angle
Rotates the material.
Offset X, Y
Shifts the material left/right or up/down.
Use default render settings
When this option is checked, the default Metallic, Smoothness, Transparency, and Glow settings are used. Uncheck this option if you want to adjust these values.
Metallic
How metallic the material is. This is typically 0 for non-metallic, and 100 for fully metallic. Note: This affects the appearance of the material, not what's underneath it. For example, car paint would typically use a Metallic value of 0 because the paint has non-metallic reflection properties.
Smoothness
How smooth the material is. Use 0 for a rough (matte) material such as concrete. Use 100 for a completely smooth surface such as car paint.
Transparency
Makes the surface semi-transparent.
Glow
This option is currently unused in Realtime Landscaping Photo.
- In the Materials column to the left of the dialog, click on the material you want to change or alter. The selected material will briefly turn white in the viewport.
- To the right of the dialog, you will see a picture of the currently selected material. Click this picture to change the material. Or, if you want to alter the current material, click the small button to the right of the picture and select Edit Color and Brightness.
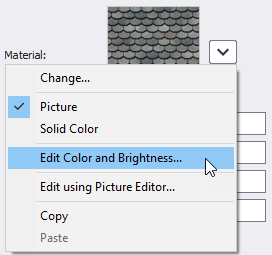
- If you would like to change the type of material, click the small button to the right of the picture and select Picture or Solid Color.
- Repeat the steps above for each of the materials you want to change.
- To reset the currently selected material to its default settings, click Reset to default settings. To reset all of the materials to their default settings, click Reset All. (If the buttons are disabled, then the materials are already set to their default settings.)
- When finished, click OK to save your changes.